Sugar Cookies
And an end (maybe) to my quest to find a sugar cookie to love.
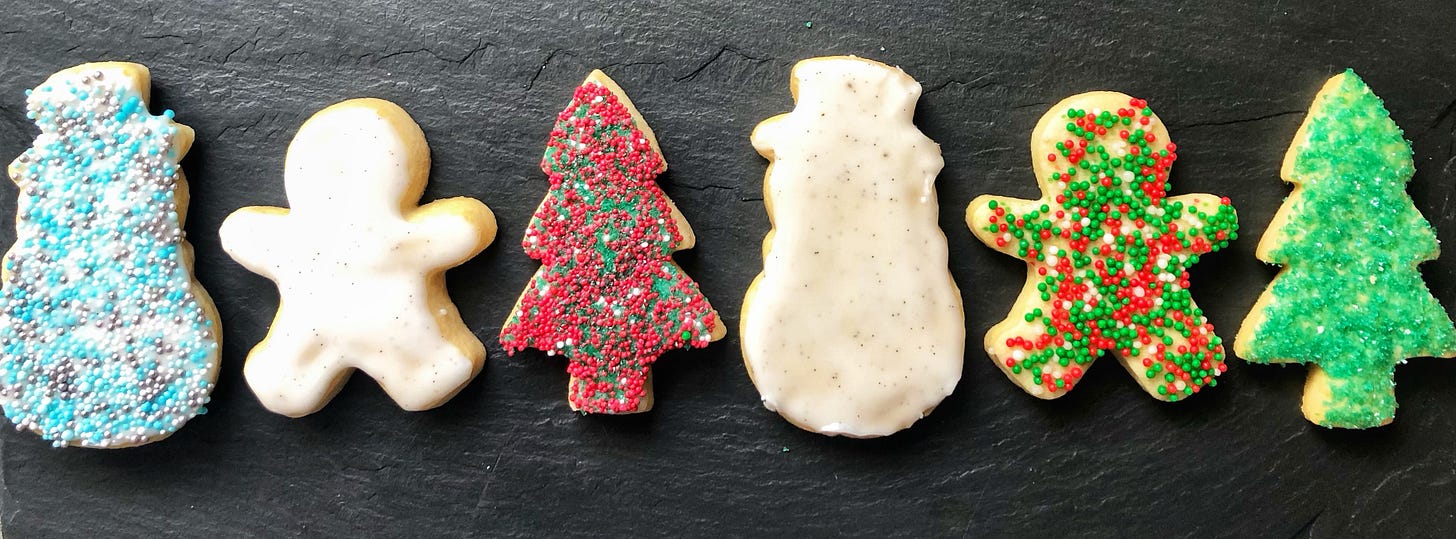
Greetings! I realize I’m a bit late to the cookie game ahead of the end of year and solstice-adjacent holidays, but hopefully if some of you are like me, you’re still getting organized on your gift giving. Today I bring you a sugar cookie recipe that has changed my overall cookie outlook on life.
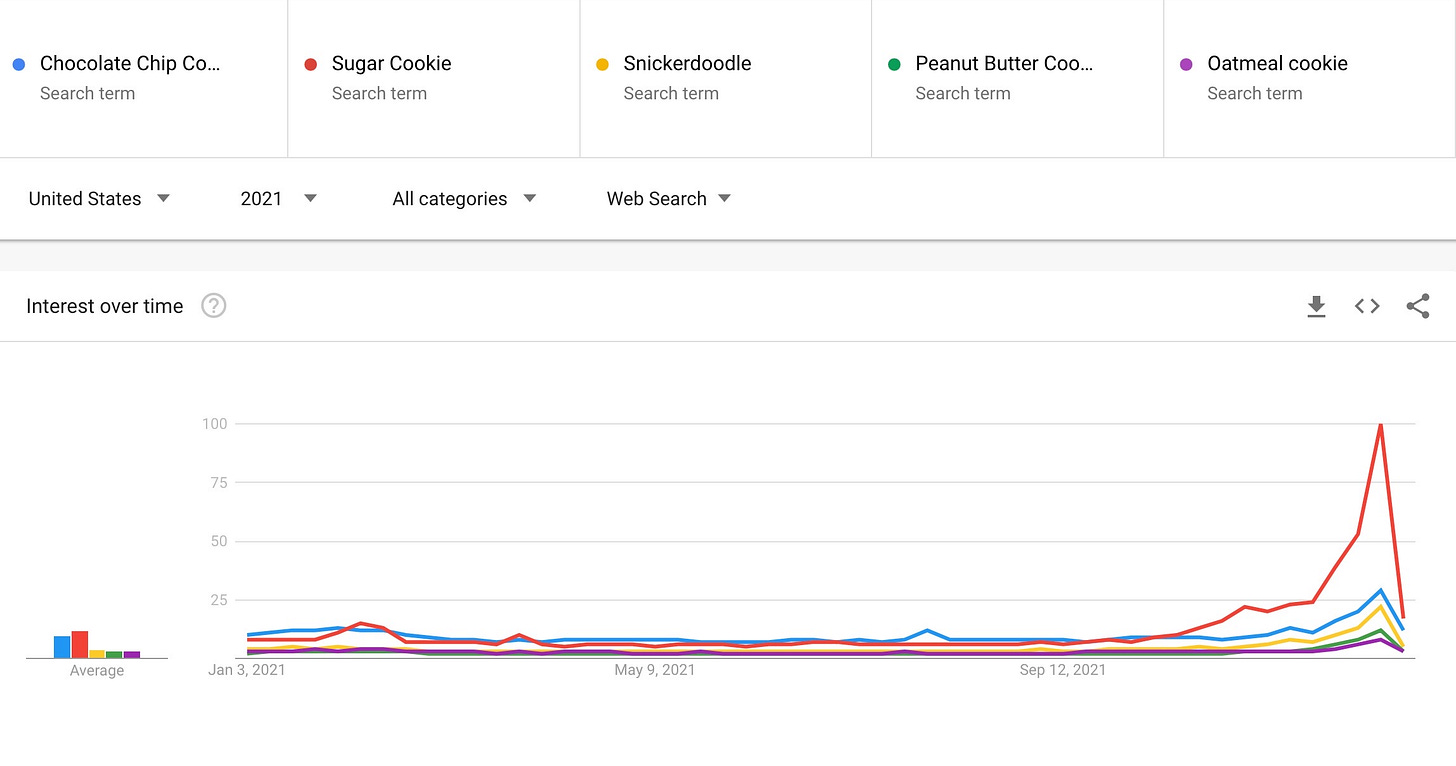
I’ll get to the background and recipe story shortly (though if you’re just here for the recipe, you can find it this way). For now, to kick us off into the land of sugar cookies (where I’ve been living these past two months) I want to share a little Google Trends chart with you. This chart represents the search interest of five of the seemingly most popular types of cookies throughout all of 2021.
What the chart very clearly shows is that from about the third week in October to the last week in December sugar cookies reigned supreme in the cookie kingdom (a kingdom I could now very easily live in, by the way). This was in contrast to the rest of the year when chocolate chip cookies were generally the more searched for cookies.
What’s especially notable in the chart is the sugar cookie peak. It’s over three times the chocolate chip cookie peak. Meaning that when you look at the year as a whole, sugar cookies were the number one searched for cookie (see the bar graph to the left of the chart).
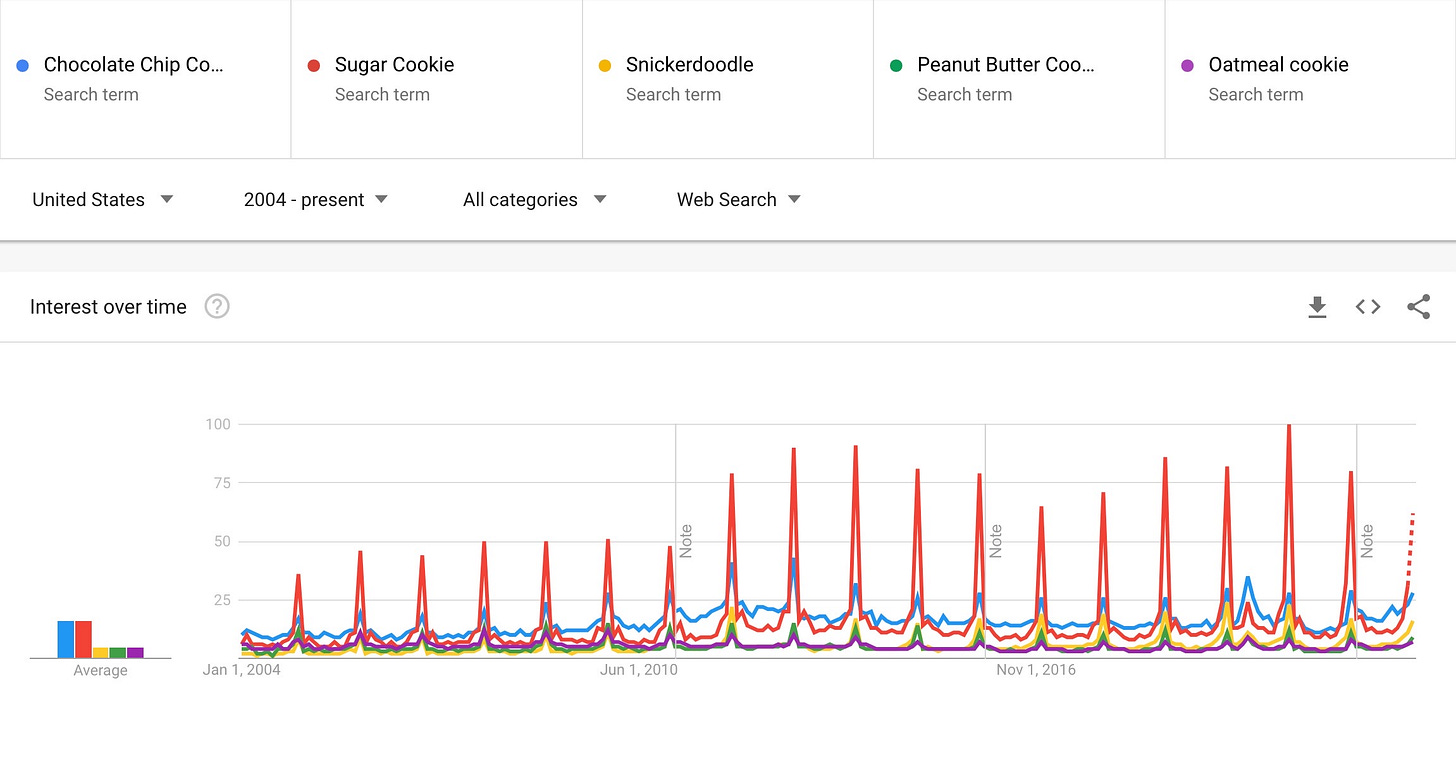
Interestingly, this hasn’t always been the case. This next chart shows the search interest of the same five cookies, but instead of a year-long look it goes back to when (I can only suppose) Google first started keeping track of this data in 2004. What you can see (perhaps only if you have a large enough screen) is that prior to about 2013, chocolate chip cookies were relatively more popular, particularly around the year end time period.
Now, there are a lot of assumptions I could make about why sugar cookies became the most searched for cookies in the last decade, but these would just be guesses and I’m not here to do that today. Instead I’m intrigued by this data because it raises a related question for me: what are the characteristics of truly great sugar cookies, and how does one go about making them (okay, that was actually two questions)?
I’ve eaten a lot of sugar cookies in my life — and tried maybe just as many different recipes — yet very few of them have been memorable. The ones I do remember are those that have been irresistibly tender and slightly soft and chewy in texture. They’ve also had prominent vanilla flavor and a little something extra to intrigue the palate — a background je-ne-sais-quoi that I hadn’t pinpointed until recently. And then of course there’s the question of a glaze. A great sugar cookie should be able to stand out on its own sans glaze. If there is a glaze, it should only serve to enhance the cookie rather than drown it in cloying sweetness.
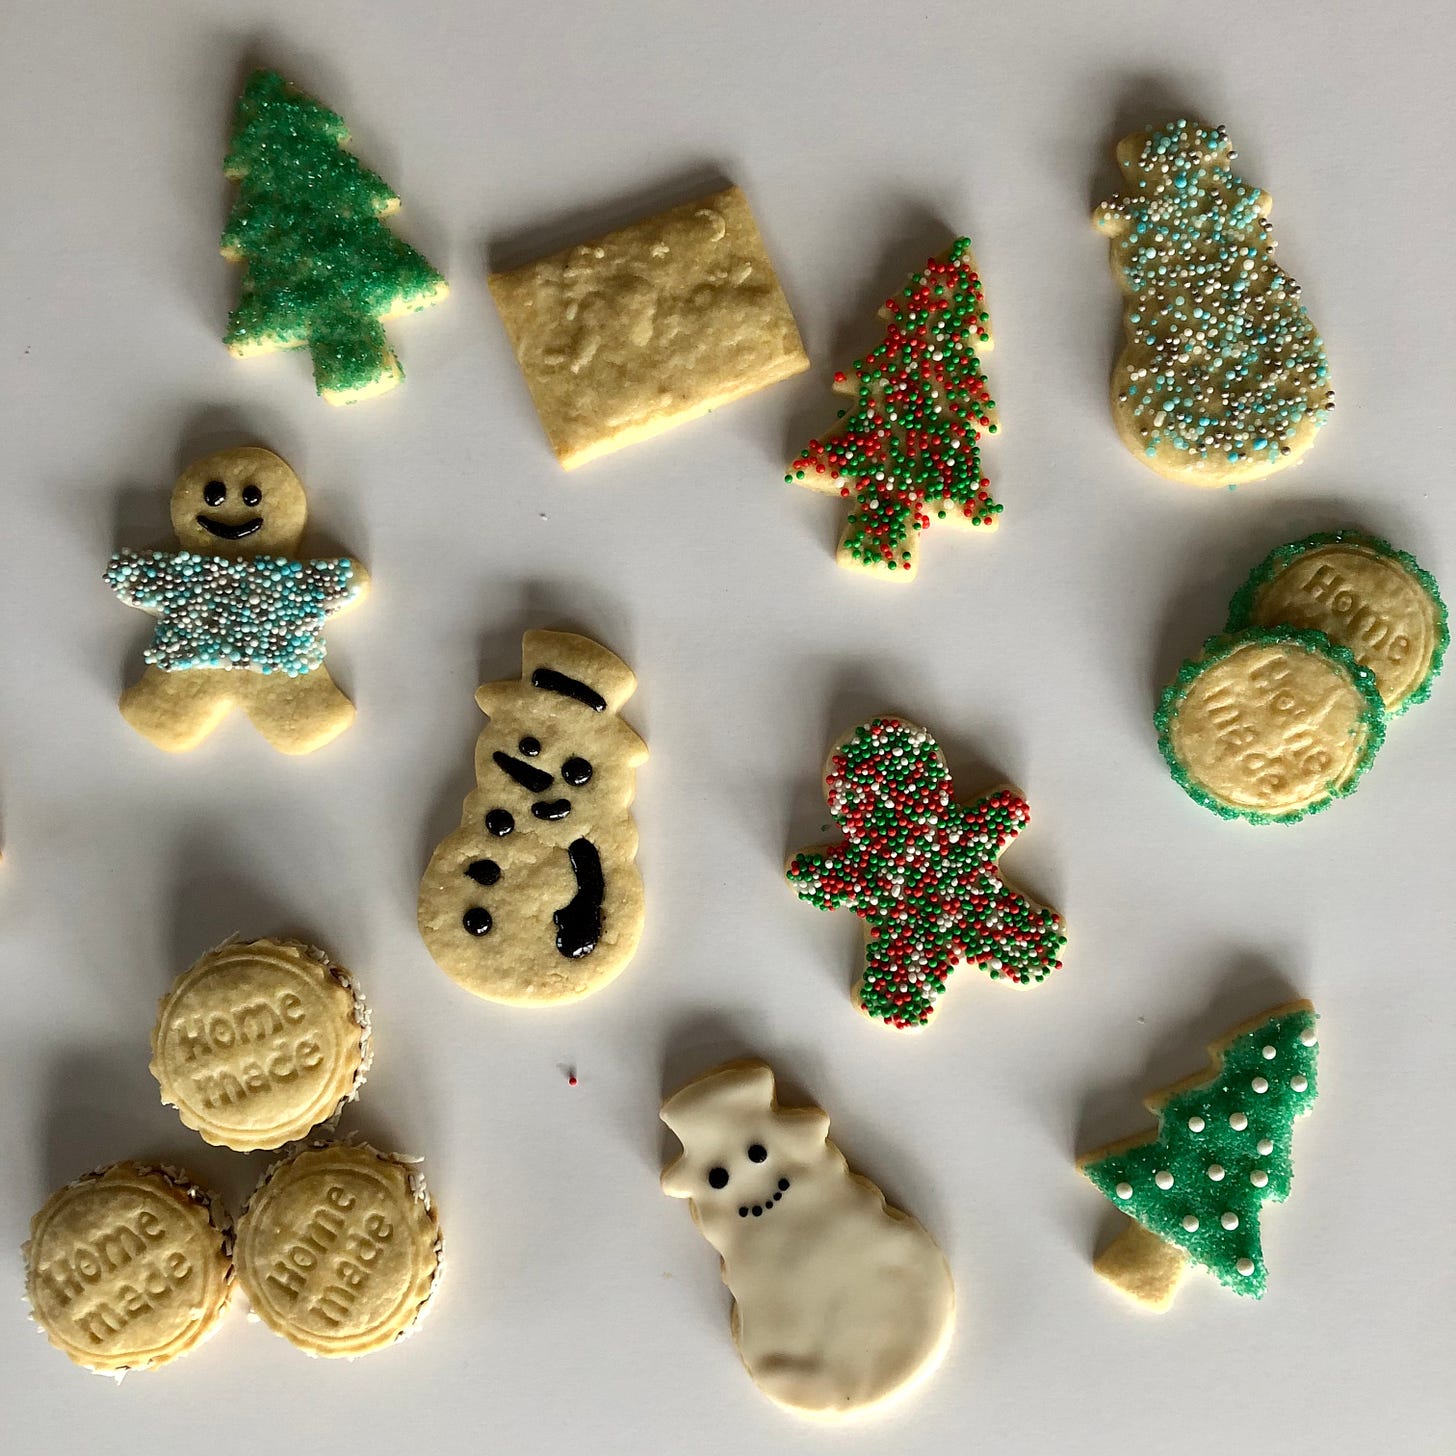
Since I have so rarely encountered a sugar cookie that has met my rather rigid standards of greatness, I decided recently to create my own recipe. Using some specific technique and ingredient choices, I am proud to present my ultimate sugar cookie recipe. Sure, it’s a little quirky, but it’s far from complicated, and I think the results speak for themself.
These cookies are soft, chewy, and tender. They have notable vanilla flavor up front and an almost undetectable alkalinity/bitterness on the finish (that mystery flavor that I promise is a good thing!). Additionally, they’re paired with a sweet, subtly tangy glaze that’s only necessary if you want it to be (or you have kids yearning to release their inner Picasso).
Before we get to the recipe however, I’m going to briefly run through my choice of ingredients and techniques. I think this information will help set us up for success, but again, please feel free to skip straight to the recipe if you’re simply ready to bake.
Sugar Cookie Ingredients:
All-purpose flour: There’s no reason to reach for anything else here. I debated trying cake flour or even pastry flour, but why complicate matters. I also have a feeling that either of these lower protein flours would mean adjusting the hydration of (or how much liquid is added to) the dough. Why do that when you don’t need to?
Confectioners’ sugar: Because this is a lower hydration (less liquid) dough and it’s not made by first creaming (beating until creamy) the butter and sugar, confectioners’ sugar will result in a smoother (less gritty) dough appearance and texture. When I tried granulated sugar, the baked cookies had a visibly speckled look and seemed crumblier.
Salt: You have to have this for flavor. I call for fine salt (as opposed to kosher salt with its larger crystals) because — especially in a low hydration application — it dissolves readily for a more even distribution of flavor. You could use table salt or fine sea salt here, but please avoid iodized salt, which might add a metallic flavor to the cookies.
Baking powder and soda: These each provide a touch of leavening, resulting in cookies that are softer and somewhat cake-like as opposed to crispy and tender. In addition to leavening, the baking soda imparts an ever so subtle alkalized/bitter note on the finish of every bite. Some people may not detect it while others may find it quite prominent. It depends on how sensitive you are to bitterness. Regardless, it should not be off-putting and should enhance the overall flavor of the cookie.
Unsalted butter: While this is certainly a time when you could use salted butter in baking (don’t add the 1/4 teaspoon of salt if you do), unsalted is just a better habit in baking. Try to use a good quality butter too. I have been baking with Cabot butter for well over a decade now (it’s also Ina Garten’s preferred brand), but there are many worthy options out there, depending on the flavor and texture you’re after (Bon Appétit food editor, Shilpa Uskokovic, has a good starting list).
Egg: There’s just one egg in this recipe, but it serves multiple purposes. You separate the yolk from the white and add them during different steps of the recipe. The yolk is added after the butter has been incorporated for yet more tenderness. And — after being combined with a little milk (see below) — the white is mixed in following the yolk to add a touch of structure and enough moisture to bring the dough together.
Milk: Whisked with the egg white, the milk helps to reduce its viscosity, making it easier to add just a portion of the white to the cookie dough. While this may seem like extra gimmicky work, you do not need the full egg white for this recipe. Plus, the milk helps turn the white into an egg wash that you can brush onto the tops of the cookies before baking (see techniques below).
Vanilla Extract: Again, this is a must for flavor. I can vouch that a sugar cookie without vanilla doesn’t taste like a sugar cookie. If you have it and can, I recommend using real vanilla extract here, especially if you’ve mostly enjoyed homemade sugar cookies throughout your life. That said, you might prefer to use imitation vanilla — with its strong vanillin1 flavor — if you enjoy packaged sugar cookies or those baked from a mix.
Sugar Cookie Techniques
Reverse creaming (or paste) method: I use this method in this recipe to incorporate the butter into the dry ingredients (rather than first creaming the butter with the sugar). This coats the flour-heavy mixture with butter (fat), preventing the gluten in the flour from forming long strands that would result in tougher, firmer cookies.
Rolling the dough before chilling: This not only cuts down on the amount of time the dough needs to chill in the refrigerator, but it also reduces the amount of elbow grease you need to put into rolling the dough out fully after you chill it.
Rolling the dough between/on parchment or wax paper: This avoids the need to use much (if any) flour when rolling out the dough. Often, excessive flour use during rolling results in cookies that are drier and crumblier.
Brushing the tops of the cookies with an egg wash: Because you don’t need all of the egg-milk mixture for the dough, you can use the leftovers as an egg wash to enhance the appearance of your cookies. Brushed on before baking, the egg wash adds a smooth glossy finish that can also serve as a glue should you like to top your cookies with any sprinkles or decorating sugars.
Bake time: I’ve found the key to the ideal texture is to not let the tops or edges of the cookies start to brown in the oven. Some might call this underbaking the cookies, but I would simply suggest that you’re allowing for the last little bit of baking to take place out of the oven as the cookies cool. It’s a good practice with any cookie, really, especially if you’re partial to soft cookies.
Sugar Cookies
Printable Version
Active time: 25 minutes
Inactive time: 30 minutes
Baking time: 14 to 18 minutes
Total time: 1 hour 15 minutes
Yield: about eighteen 2” to 3” cookies

Sweet, partly crisp and tender, and partly soft and chewy, this sugar cookie seemingly achieves it all. It’s the ideal sugar cookie in my book because it’s sturdy enough to decorate, yet surrenders any evidence of toughness as soon as you bite into it.

Ingredients
Dough
- 1 1/2 cups (180g) all-purpose flour
- 1/2 cup (57g) confectioners’ sugar
- 1/4 teaspoon fine salt
- 1/8 teaspoon baking powder
- 1/8 teaspoon baking soda
- 8 tablespoons (1 stick, 113g) unsalted butter, cold, cut into 1/2" cubes
- 1 large egg, yolk and white separated
- 1 tablespoon milk
- 1 1/2 teaspoons vanilla extract

Glaze (optional)
- 1 tablespoon cream cheese, softened
- 1 1/3 cups (152g) confectioners’ sugar
- pinch fine salt
- 2 tablespoons (28g) milk
- 1/2 teaspoon vanilla extract or the seeds scraped from 1/4 vanilla bean, optional

Topping
- Sprinkles or decorating sugars

Directions
1. To make the sugar cookie dough: Combine the flour, confectioners’ sugar, salt, baking powder, and baking soda in a large mixing bowl, the bowl of a stand mixer, or a food processor fitted with a blade attachment. Stir or pulse until evenly incorporated.
2. Add the butter cubes and work them into the dry ingredients until fine even crumbs form; this can be done by breaking up the butter with your fingers or a fork, mixing on low speed of a stand mixer fitted with the flat beater attachment, or pulsing the ingredients together in your food processor.
3. Separate the egg white into a small measuring cup and add the egg yolk to the butter-coated dry ingredients, stirring or pulsing it in until evenly blended.
4. Whisk the milk into the egg white briefly then add 1 tablespoon of this mixture and the vanilla into the mixing bowl or food processor; you’ll want to measure the tablespoon by pouring from the measuring cup into the measuring spoon (it’s hard to scoop out a level tablespoon because of the protein structure/gluey-ness of the egg white) or by weighing out 14g of it. Reserve the remaining egg white-milk mixture (egg wash) for later.
5. Mix or pulse the ingredients together briefly until larger clumps start to form. Use your hands to bring the dough together into one mass.
6. Transfer the dough to a piece of parchment or wax paper, cover with another piece of paper, and roll the dough out until it’s about 1/2" thick.
7. Refrigerate the dough in its paper blanket until firm, about 30 minutes.
8. Preheat the oven to 325°F. Line a baking sheet with parchment paper.
9. Remove the dough from the refrigerator and continue to roll it out on the parchment or wax paper until it’s 1/4"-thick. Use a light dusting of flour if necessary to prevent the dough from sticking to the paper or your rolling pin.
10. Cut out your desired cookie shapes and transfer the cookies to the prepared baking sheet.
11. Brush the cookies with the reserved egg wash and top with sprinkles or decorating sugars if desired.
12. Bake the cookies for about 14 to 18 minutes, until their bottoms just start to become golden; you will see little to no coloration on the tops and sides of the cookies.
13. Remove the cookies from the oven and immediately transfer them on the parchment paper to a rack to cool.
14. To make the glaze: Combine all the ingredients in the order listed and stir until smooth.
15. Spread the glaze onto the cooled cookies with an offset spatula or other spreading tool. Top the freshly glazed cookies with sprinkles or decorating sugars if desired then set the cookies aside until the glaze is set, 30 minutes or so.
16. Storage information: Keep glazed or unglazed cookies at room temperature in an airtight container for up to 1 week. Freeze unglazed cookies for up to 1 month.
Thanks for powering through this lengthy post all about sugar cookies. As I started working on this project, it became very clear that I had a lot of pent up desire to pursue it. Please let me know if you try out the recipe or if you have any questions or concerns related to it. I’m always happy to hear from you! A click on the ❤️ is also especially meaningful.
Best,
Charlotte
P.S. This will likely be my final post of 2022. I’ll be back in 2023 with more recipes of my own and from other talented recipe developers. I hope the end of the year brings us all our fill of smiles, rest, and gratitude.
Vanillin is the primary flavor component of vanilla and is manufactured from the organic compound, guaiacol. In contrast, real vanilla is derived from a vanilla bean, or the cured seed pod of an orchid. If you’d like to know more on this subject, this short article by Hannah Crowley for America’s Test Kitchen is worth a read.

Thank you! I totally needed your explanation!